Hello lovelies!
I thought I'd do a quick blog with some Easter treats for y'all :)
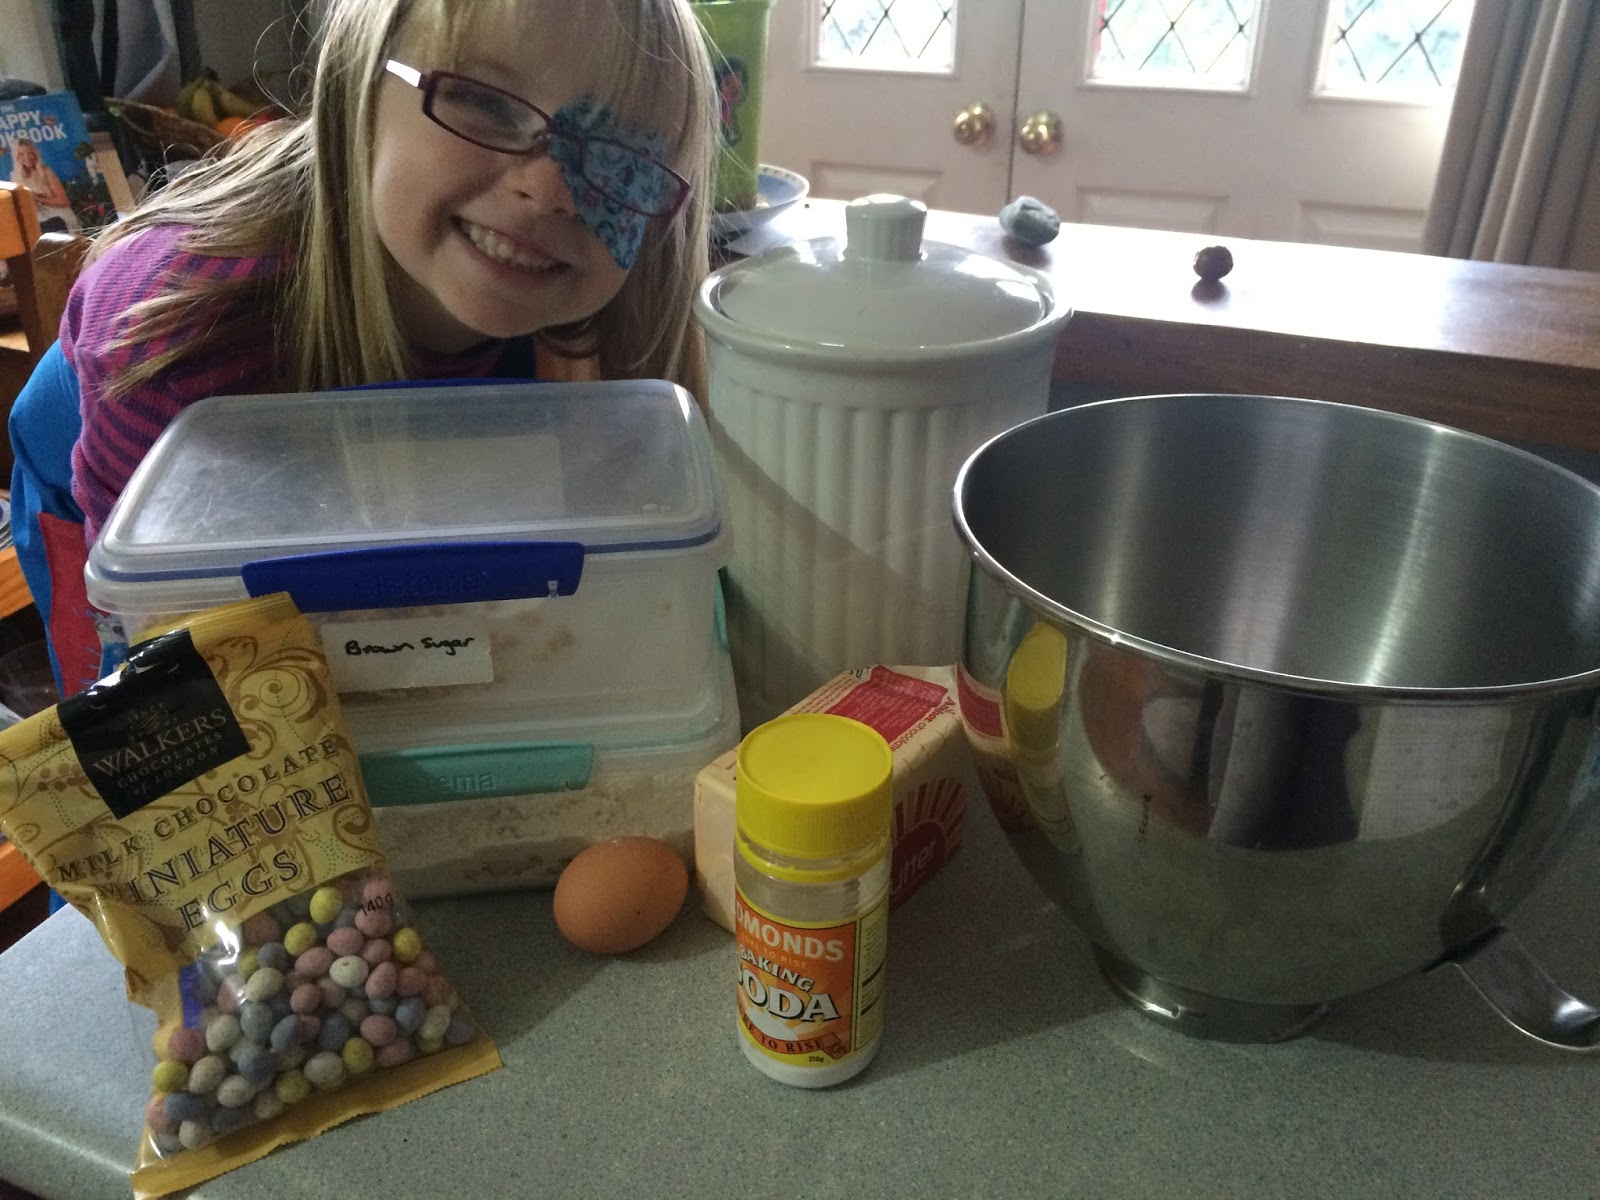
My daughter and I set to work this morning, making a batch of Easter cookies. For all those who have followed me before, we used my basic chocolate chip cookie recipe but exchanged the choc chips with mini Easter eggs. Such fun!
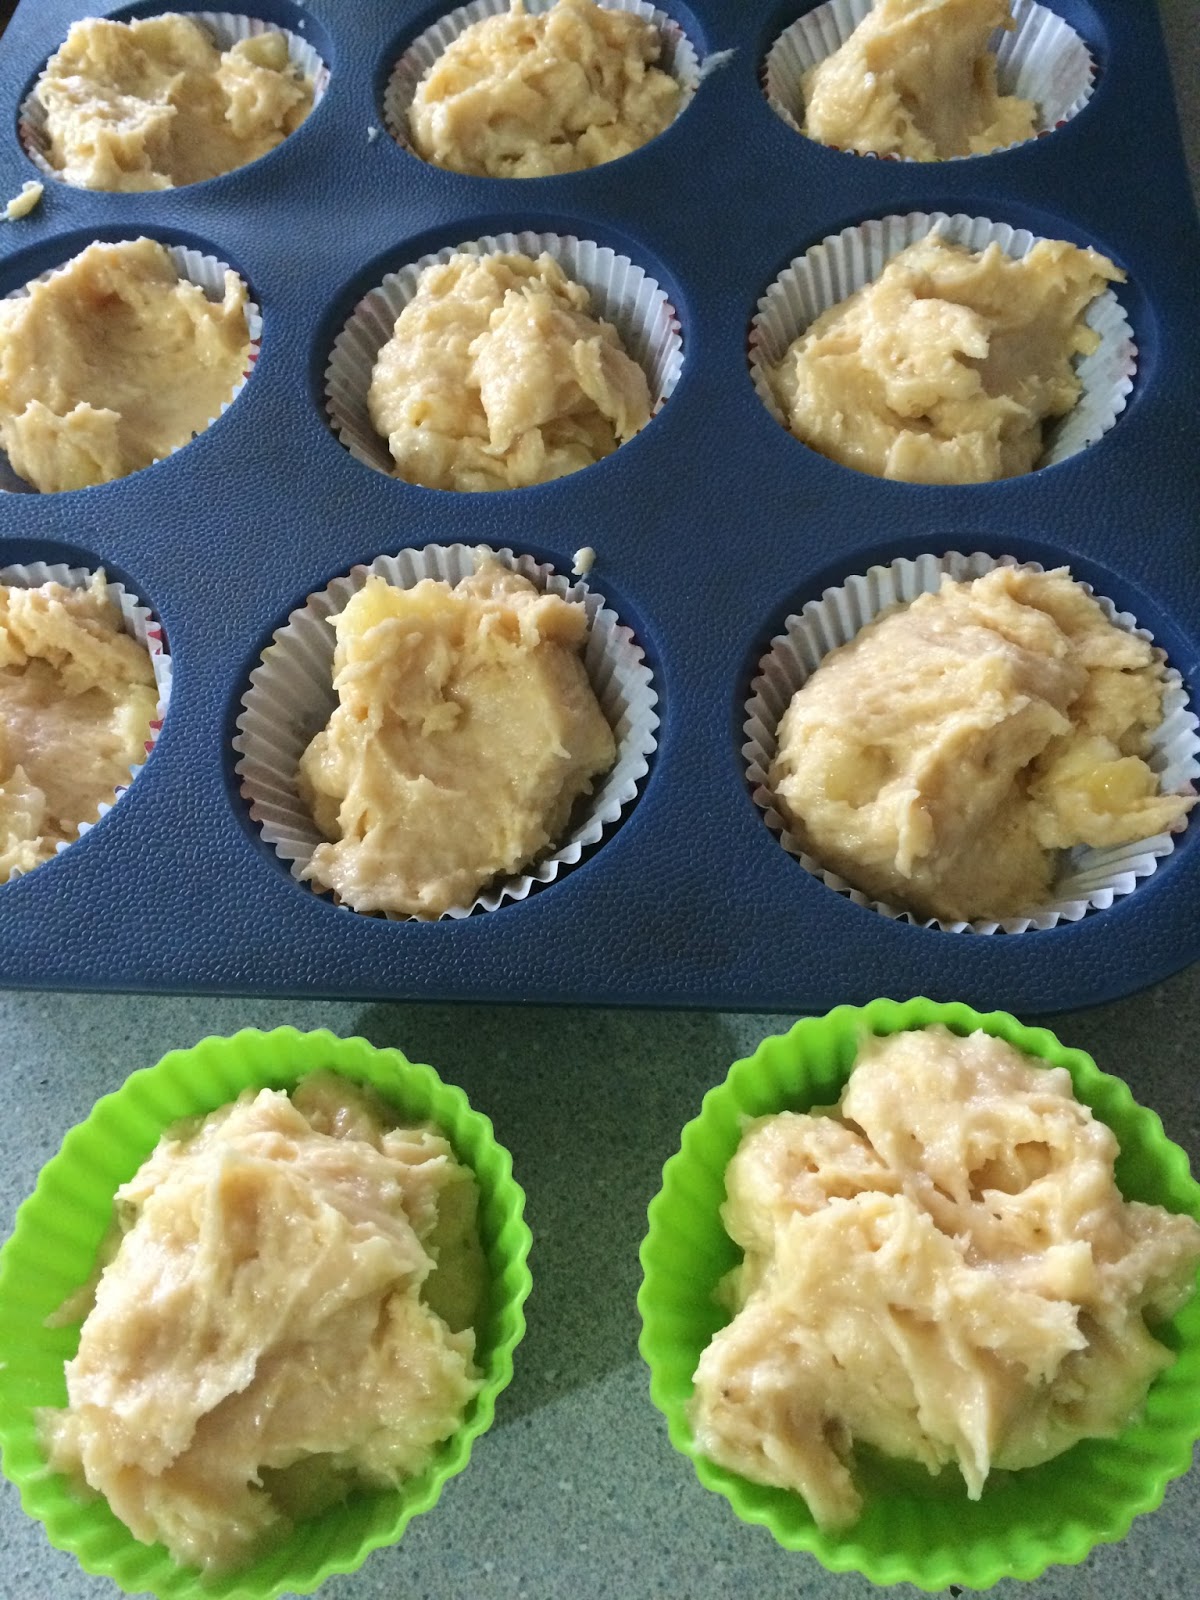
Still on a chocolate high, I decided to try my hand at some Easter cupcakes. I kinda threw ingredients together, but it seems to have worked!
I also have some lovely dinner ideas for these cooler days we've been experiencing. One is a dish that my American friends are huge fans of. Biscuits and gravy. Don't worry kiwis, it's not as bad as it sounds! It's actually really tasty, and I even had my children licking their plates and requesting that I make it again the next night.
The other is a crazy mince and cheese pie, inspired by my friend who was making cauliflower cheese for tea. I already had mince out, so decided to try and combine them in a pie.
Easter cookies
75g butter, softened
1/2C sugar, 1/2C brown sugar
1 egg
1/2C mini Easter eggs
1/2tsp baking soda
1 1/4C flour
Beat butter and sugars together. Add egg and beat again.
Mix in the Easter eggs. I used mini candy coated ones, you could use any variation.
Sprinkle flour and baking soda over top and combine.
Roll into teaspoon sized balls and flatten with a fork.
Bake at 180C for around 10-15 minutes
Easter cupcakes
75g butter, softened
1/2C sugar
1 tsp each of vanilla essence and raspberry essence (optional extra)
2 bananas
1 1/2C flour
1tsp baking powder
1/4C milk
choc eggs for decoration
Preheat oven to 180C and line cupcake tin with cases
Beat butter and sugar with essences of your choice. I recommend using vanilla as a base. You don't have to add the other essence, I just thought it would be quite tasty.
Break up bananas and add (you can mash, but I prefer to have chunks). Mix
Sift flour and baking powder and fold in.
Add milk to soften.
Spoon into cases. I got 14 out of this.
Gently press a choc egg into the top of each cupcake.
Bake for approx 20 minutes.
Biscuits and Gravy
Biscuit mix:
2C flour
1Tbsp baking powder
1 tsp salt
1 tsp sugar
6Tbsp butter, cold
1C buttermilk
Combine dry ingredients. Cut butter in to resemble breadcrumbs. Add buttermilk and combine. I got in there with my hands and gave it a gently knead too.
Roll out to about an inch thick and using a round cutter, cut out biscuits.
Place on baking tray and brush with milk.
Pop in the oven at 180C for around 10-15 minutes (basically like scones)
Gravy:
350g sausage meat (from proper sausages, not that pink stuff)
1/4C flour
2C milk
salt and pepper.
optional extra - grated cheese
Heat frying pan and add a little olive oil.
Break up sausage meat into small chunks and fry until cooked through.
Sprinkle half the flour over and give it a stir. Add the other half.
Slowly pour the milk in, stirring continuously.
Season with salt and pepper and allow to heat through until it has thickened.
If you want, you can add a little grated cheese to this too.
Slice biscuits in half and scoop gravy over top. I had two biscuits and was full after that. They are very filling!
I believe the Americans eat this for breakfast, but I think it works for any time of day.
Crazy Mince and Cheese Pie
Now this was kind of a spur of the moment meal with a bit of "whatever is in the pantry" type of meal. I found one lone sheet of puff pastry, so decided to use that as the base for my pie.
I heated a pan with olive oil and fried off some diced onion and mince.
Add some vegetables to this (I used carrots and peas) along with one or two tins of tomatoes.
I had about a cup or so of leftover pasta spirals, so I added those too.
Bring it to the boil and let it simmer a little.
Meanwhile, make up a cheese sauce
3Tbsp butter
2-3Tbsp flour
salt and pepper
1 1/2C milk
1/4C grated cheese
Scoop mince mix into dish lined with pastry. I chose to use up the last of the hash browns in our freezer by lining the top with them. You could, however use *pastry if you like.
Pour cheese sauce over. Sprinkle with extra grated cheese.
*If using pastry, pour sauce over mince first.
Pop in oven at 180C for around 45 minutes
There you go, that should keep you going for the long weekend! Enjoy your Easter treats!
Hi my pretties! Long time, no see!
I have no real excuse for being such a slacker on the blogging front. I just found it easier to post directly to Facebook as it took less time than writing up a blog, but I am back! I will endeavour to write more of these throughout the year.
Last night we went over to a friends for dinner and I made a pudding that I'd watched Nigella make, and wanted to attempt. Alas, I had had too many wines and didn't feel like eating it myself, but it was well received by others :)
You may have heard of a dessert called Grasshopper Pie. This is what I made, only mine wasn't green. Ordinarily it would be made with green Creme de Menthe and blond Creme de Cacao, but I had some Prenzel on my shelf that I wanted to use. Mine was a chocolate brown colour instead. I still used the same choc-mint flavour, only I had Peppermint Schnapps (which is clear) and Chocomulu (which is a syrupy chocolate liqueur).
I didn't have the recipe with me when I did my shop, so in true Calamity Jayne styles, I had all the wrong quantities! It still worked though. I actually ended up with extra filling, so I will write out the quantities I think would have been better.
Grasshopper Pie
250g chocolate biscuits (I used a budget TimTam type)
80g dark chocolate
50g butter (melted)
Put into a food processor and blitz to a sticky crumb.
*side note - I couldn't remember if the chocolate was meant to be melted so I just put it in as is, though I think it was probably meant to be melted)
Press into a flan dish - I used a silicone mould, though a loose bottom tin would be just as good. Sit in fridge to set.
100ml milk
100g white marshmallows
60ml Peppermint Schnapps/Creme de Menthe
60ml blond Creme de Cacao/Chocomulu
300ml cream
Put milk and marshmallows in a small saucepan and heat, stirring until marshmallows have melted in. Take off the heat and put in a bowl. Add your alcohol choices and mix. If you are wanting it to look a little more green, you can add a few drops of food colouring.
Leave this to cool slightly, while you whip the cream.
Fold the cream into the green/choc brown mix.
Pour into base and smooth the top. Set it in the fridge.
When ready to serve, grate some extra dark chocolate on top. Voila!
This morning, my daughter asked for pancakes for breakfast. She was given an apron at Christmas time and she has been wanting to help out in the kitchen ever since. I agreed to make them, and had her and her sister help with mixing.
In case you don't have a pancake recipe, here is what I use:
1C flour
1C milk/water
1 egg
pinch of salt.
I double it usually, but this is a standard recipe. I normally do half milk and half water. You can add more milk/water to your mix depending on how thick you like your batter.
I decided to make caramelised pears to go over top. To make these, I peeled and cored two pears. I sliced them into long strips.
Heat some butter in a pan and add pears. Let them cook in the butter for a while before adding a teaspoon of vanilla. Stir. Sprinkle in some brown sugar - I just eyeball it until it looks like enough.
Keep it cooking, stirring occasionally. Spoon over your pancakes.
For lunch, I decided to use up some leftovers in the fridge. I still had some sausages from the previous night, and tomatoes that needed to be eaten.
I chopped these, along with an onion.
In a saucepan, I got 1C of rice cooking.
I heated a frying pan with olive oil and when warm, I added the onion and leftover sausage. I fried that until it was cooked through. I added the tomatoes.
I drained the rice and added this to the pan too. Season and stir.
Crack a few eggs - I used three - and stir them through. The heat from the pan and the cooked food will cook the eggs.
Serve!
So there you go. After waiting with baited breath for over a year, you now have three recipes to add to your repertoire :) Enjoy! Happy cooking my lovelies!
Hello one and all! I realise this is the first time I've written since the new year began, very slack of me! I guess with the Facebook page it's too easy to just post directly on that. I will endeavour to write more.
This week I have two recipes for you. One I posted on my page, but changed it (as per usual) and the other I got from the Ceres cookbook (and again, altered slightly.)
I recently joined a FB page for slow cooker recipes and now my newsfeed is bombarded with peoples recipe suggestions and I am really looking forward to trying some of them. It's always nice to try new things in the slow cooker. Anyway, this one was called "Kill a kilo soup" and I thought "Brilliant! I could do with losing a kilo!" I perused the recipe, and not only did it sound yummy, but all the ingredients, I happened to have in the fridge and pantry. If you want the original recipe then you can find it on my FB page, but here I will post it the way I did it.
Kill a kilo soup
2 onions
4tsp crushed garlic
1/2 cabbage
1 capsicum
2 carrots
2 zucchini
1 tin tomatoes
French onion soup packet
500ml water
chilli flakes
Now you just chop it all up and throw it in the slow cooker for 4hours. I just had it on low as I was going to have it on most of the day. Now here's the thing. It probably would have been fine as it was, but when I got home at lunch time, I wasn't so keen on the smell of it. I tried the broth of it and wasn't terribly impressed with that either. So I mashed it - as I had seen that they did that on the FB recipe too. It tasted slightly better but still not that great. So I added about 1Cup of dried chickpeas and some meatballs that I had in the freezer.
The longer it cooked, the better it tasted. I served it with a dollop of sour cream and bread. I think the meatballs really didn't need to be in there but the chickpeas were a great addition.
(You'll have to excuse the photo - I was sure it was clearer than that when I took it!)
The second recipe I have for you is a cookie one. They are Almond Butter cookies - however I didn't quite have enough so I used a little nutella and LSA in place. They were fantastic! Chewy and crunchy - just the way I like them.
1 Cup Almond Butter (or 1/2C almond butter, 1/2C nutella)
3/4C Demerera Sugar
1 egg
1tsp vanilla
1/2tsp baking soda
1/4tsp salt
Almonds chopped
Preheat oven to 180C
In a large bowl, beat together all ingredients except chopped almonds.
Scoop out tablespoon portions and arrange on baking tray with plenty of room for them to spread. With wet hands, flatten slightly.
Sprinkle chopped nuts in centre of cookies.
Bake for 10-13mins until golden around the edges. Cool on the tray before putting on wire rack.
So there you have it, two awesome recipes that are super simple to make. If you haven't already, then like my FB page! Happy cooking!
Ok guys, I have a confession to make. I'm still eating sugar! I've tried but my hearts just not into it - I know, I know :(
I am trying to reduce my intake and if I am choosing between two brands, I will take the one with lower sugar, but I'm not cutting it out altogether. I just like it too much!
I am however still on the organic products where ever possible, and won't eat anything with "diet" or "light" or "lite" in it's title, cause let's face it, that stuff is nasty.
I do have some great recipes to share with y'all though :) And they're not too bad on the sugar scale either. I do recommend making your own tomato sauce with the recipe from last blog, I don't buy it anymore, just make my own and the kids haven't even noticed a difference :)
What have I made this week? Date slice, Jamie Oliver's cauliflower cheese, chicken and couscous salad, that yummy egg slice that I posted on my FB page, and some awesome salmon pastries (forgot to get a pic of these though).
First up, I'll go with the salmon - super simple and tasty.
All you need is puff pastry, cream cheese and salmon slices.
Roll out pastry and cut into squares. Spread cream cheese in centre (generously) and then top with salmon. I also topped a tiny bit of grated cheese on top too, but you don't have to do that.
Pop in the oven at 180C until pastry has puffed up. Voila!
Cauliflower Cheese
Oh...My...God! Soooooo good!
This is from Jamie Oliver's "Save with Jamie" book.
It does take a bit of time to make, but it's well worth it. The sauce is so creamy and not too cheesy so you can still taste all the vegetable flavours.
2cloves garlic crushed
50g butter
50g flour
500ml milk
500g fresh or frozen broccoli
75g grated cheese
1kg fresh or frozen cauli
25g flaked almonds
breadcrumbs
olive oil
Place butter and garlic in saucepan and heat until butter has melted. Add flour and stir until combined.
Gradually add the milk, whisking as you go. Once smooth, add the broccoli (cut into florets) and simmer for around 20mins until softened enough to mash.
Using a stick blender, mash it up - you can leave some lumps of broccoli in it too if you want.
Grate in half the cheese, season and mix.
Cut cauli and place in a greased casserole dish. Pour over the cheese sauce.
In a bowl mix almonds with some breadcrumbs - fresh or dried. Season with salt and pepper and drizzle a little olive oil over. Mix it and then sprinkle over top.
Bake at 180C for 1hour.
Seriously good. The crunch of the almonds, the creamy sauce, the garlic. All works so well together.
Chicken and Cous Cous Salad
My sister gave me the recipe for this Roast Vegetable Cous Cous Salad, and I decided to add in some baked chicken breast as well. Quite tasty with or without chicken.
You can be your own chef with this one, and use veges that you like. This time I used red onion, kumara and potato. You can also use pumpkin or any other roast veges. I do recommend using the red onion in all versions though.
Cube your choice of vege, toss in a little oil and roast until tender.
Rub oil, salt and pepper into your chicken breast and bake until cooked through. Slice.
Place 1C cous cous in a bowl, sprinkle some cumin seeds over and pour 1C boiling water over. Cover with a tea towel.
Fluff cous cous with a fork, add veges and some seedless, red grapes (sliced), and the chicken. Mix in the sauce.
Sauce: 1/4C oil, 2tsp curry, 2tsp vinegar (I used red wine vinegar), 1/2tsp sugar, 1 clove garlic crushed.
combine.
The egg slice recipe is on my page which you can find here. It was yummy, though I did find it sweet. It was also good re-heated the next day - hubby had it in a sandwich with Sweet Chilli sauce.
Date Slice
This is one from the good old Edmonds cookbook. I found the base mix was actually quite soft so instead of rolling it into two parts, I just kind of blobbed it in the tin and spread it with my hands, then on the top, I placed blobs again. I think it gives it a much better look than just a plain sheet of dough.
Filling:
1C dates (I used organic)
1/3C sultanas (optional)
1C water
1Tbsp brown sugar
1tsp butter
2tsp cocoa
1/2tsp vanilla
Put all ingredients except vanilla in saucepan and cook gently over low heat until a paste like consistency is formed. Add vanilla and cool.
Base:
125g butter
1/2C sugar
1 egg
1 3/4C flour
1tsp baking powder
Cream butter and sugar until light and fluffy. Add egg and beat well. Fold in flour and baking powder. Press half into base of a slice tin. Spread with date mixture. Blob remaining mix on top.
Bake at 180C for 30mins.
So there you go, lots of recipes to keep you going. I will be getting into the Christmas cooking soon too, so keep an eye out for those!
Hope you have all had a fabulous long weekend, Happy Cooking!
Hello my lovelies! I'm so sorry it has been an age since I have graced you with my presence but due to health reasons I had to take a wee break :) I am currently having trouble with my oven so experimenting is not the easiest at the moment, but I will push on through!
So, as my loyal FB followers will have seen, I have been inspired by Nigel Latta's doco about sugar being poison. You all know what a sweet tooth I have, so this is quite a challenge for me, and I have to admit, I have fallen off the sugar wagon a few times.
Now I'm not cutting it out completely, but trying to lessen how much sugar we eat. You may be surprised at how much is actually in everything you eat. As Nigel pointed out, the big companies use sugar to keep their costs down - they reduce how many dearer ingredients they use and replace it with sugar as it is cheap. I dare you to take a look at the tables on the back of your food labels and see just how much sugar is in everything. Look at the 100g/ml column so you can compare with other products.
I think a lot of you will be interested to know that the "lite" "diet" options are generally higher in sugar than full fat products. This is because you lose flavour when you take away the fat, so they replace it with sugar.
I have found quite a handy (free too) App you can download on your phones. It's called "FoodSwitch" and what you do is scan the barcode on food products and it will tell you what better/healthier options are for you.
What I have found out so far is that protein is something you should eat at every meal and snack too if you can. You find protein in meats, egg, milk, cheese (things that come from animals).
Also drinking more water and less coffee/fizzy/juice.
You can find more info on this page here. It gives examples of how Nigel changed his diet. Also this one here is another good one to read.
I will point out that naturally occurring sugars (like in milk and fruit) are ok because they behave differently to the added refined sugars. So you when you are calculating your sugars, you don't need to include these.
For your information, 1tsp of sugar weighs approx. 4g so you want to be looking for that amount or lower in your nutritional information labels.
So far I have tried some sugar free cookies which were pretty average really. My problem with them was that they were more like a scone than a biscuit, and I found the texture disappointing. I like the crunch of a cookie!
I have also made a sugarfree (though has dried fruit) slice which is actually not too bad, and a tomato sauce using dextrose instead of sugar and a considerable amount less than the bought stuff. Tastes pretty good though!
I got the sauce recipe from another blogger, though I adjusted it a smidge. Here's what I did:
375ml tomato puree (I used organic)
4Tbsp dextrose
1/2C water
1C white vinegar
1tsp salt
1/2tsp onion powder
1/4tsp garlic powder
combine all ingredients in a medium pot and heat while stirring. When it starts to boil, reduce to a simmer for 25mins, stirring occasionally.
Remove from heat and cool.
The original recipe used 1C dextrose and as this is still a sugar I felt the need to reduce it. You'll see that sauces are pretty high in sugar, so anyway we can make our own with less is better.
The sugarfree bars, I may try to adapt that recipe a bit more before I share it on here :)
Anywho, I'm sure you weren't expecting quite that kind of a come back! I hope it has been interesting for you :) I'll try to write more again soon. Have a great week! Happy cooking everyone!
Hello and Good Morning to you all! This week I am lucky enough to be involved in a wonderful expo organised by a good friend of mine - "Back to Basics". There will be heaps of stalls there where people can find out about living savvy and sustainably. You can find out more here.
I will be doing a stall with homemade vegetable soup, pumpkin soup and pumpkin scones. People will be able to have a taste, take some recipes and also view my cookbook - only have a few left so will be taking orders!
Anyways, if you are in the Ashburton area on Saturday afternoon, I hope you do pop in and have a look. It's free entry and I'm confident you will go home inspired! There will be preserving, recycling, natural remedies, power saving, DIY and much more!
I have done a little experimenting this week. Coconut sugar is something I have been wanting to try for a while and my girlfriend bought some the other day and gave me a bit to try. This wasn't in granulated form as we expected - though have since found out you can get it that way. It was more like a dough really. I have used it in some biscuits and a slice. Didn't turn out too badly either.
Chocolate swirl biscuits
1/2C coconut sugar
50g butter
1tsp vanilla
1 1/4C flour
1tsp baking powder
1/3C chocolate drops
Heat sugar, butter and vanilla in a saucepan over a low heat until combined. Add flour and baking powder, mix then when almost combined, add chocolate. It will start melting so stir quickly.
Roll into balls and flatten. Bake for 10-15 mins at 180C
*This does get messy with the chocolate melting so you may want to use gloves or spoons.
Apricot and Date Bars
This recipe is from the FB sensation "Feed a family of 6 for under $20" and I just changed a few things :)
1C rolled oats
1C cornflakes
1/4C dried apricots
1/4C dates
1/4C raisins
50g butter
1/4C coconut sugar
1/4C golden syrup
pinch of cinnamon
1tsp vanilla
1/2C dark choc
Preheat oven to 180C and line slice tin.
Put oats, cornflakes, cinnamon and fruit cut into bits into a bowl.
Heat sugar, butter and golden syrup in saucepan. Allow it to simmer for a few minutes.
Add vanilla.
Pour into dry ingredients and mix well.
Press into tin and bake for 15mins.
Allow it to cool before drizzling with melted chocolate.
Just the two recipes for now, but do keep an eye on my page where I put up different recipes all the time :) Have a great week and I hope to see you on Saturday! Happy Cooking!
What an interesting weekend I have had! My darling daughter turned two on Saturday and we had a family get together for it. I spent a very long time the night before preparing her cake. This is what it was meant to look like:
I of course decided that I didn't need to see the pic again and did it from memory. I didn't really think too much about the shape of the car - I should have rounded it off on the edges. The wheels didn't look how I'd hoped they would, and so I kinda gave up and just went "That'll do". It wasn't until then that I decided to have a look at the original picture. As you can see, mine is not quite to par! But Kaylee loved it and that's all that matters.
However, on the day, Kaylee thought she would help herself to the cake instead of waiting for me to bring it out. I caught her in the pantry, with the cake off the shelf, off the plate and on the floor - still up the right way I might add - and she was pulling the lollies off of it! The cake was then labelled "Floor Cake" and was a running joke for the rest of the day. Good times.
In her defence - we had done a photo shoot "cake smash" earlier in the week, where she had the whole cake to herself (and her sister after a while) and they ate it sitting on the floor. Perhaps she was re-living this fun day!
The other awesome thing to happen was that I picked up my Organic order on Friday! Oh My Gosh! My cupboards are so full right now, it's fantastic! And the taste of some of that organic stuff is A-Maze-Ing! Dried apricots and raisins are so much plumper and have much better flavour than regular run of the mill supermarket brand stuff. The apricots had an almost purple colour to them and taste like a cross between a date and an apricot. The raisins are not gritty and are twice the size of supermarket ones. My kids are loving it! I've been making everyone try them :)
On that note, I used the apricots to make a Dried Apricot Jam, which tastes almost like a marmalade. I also made some Green tomato chutney, a sausage cassoulet, and some shortbread biscuits.
The jam is the recipe from the Edmonds cookbook - only I used Organic Demerera Sugar instead of white sugar. Gives it a caramelly (yes I'm making up a word) flavour.
Dried Apricot Jam
250g dried apricots chopped
2 3/4C water
1/2C lemon juice
440g tin crushed pineapple
3 1/2C demerera sugar (or white if you want to stay traditional)
Soak apricots in water for 12 hours - I didn't soak as long as these are not as dry as other apricots and they were really soft after only a few hours.
Bring to the boil and simmer for 20mins. Add lemon juice and pineapple. Return to the boil.
Add sugar, stirring until dissolved. Boil briskly, stirring occasionally, until setting point is reached.
Now as you know, I've had trouble recently getting my jams to set - this is no different I'm afraid. I think I get too impatient and worry that I'm going to overcook it. This time though I think I needed a bigger pot cause I had to keep turning it down a bit to stop it popping jam all over the stove!
My chutney I have not tried yet, so I'll wait before I give that recipe.
The sausage cassoulet is one of Jamie Oliver's recipes. I made a double batch so that we could have it two nights for dinner. This is one of those meals that can really stretch and you could do what I did and add more veges to make it go even further.
6 slices of streaky bacon chopped
4 quality sausages
olive oil
2 carrots
1 red onion
1tsp sweet smoked paprika
1x 700ml jar passata
1 tin cannellini beans
1/2 bunch rosemary fresh
Preheat oven to 180C
Using an ovenproof casserole dish, place on top of stove at medium heat with a good lug of olive oil. Add bacon and sausages and keep stirring until golden.
Meanwhile, cut up carrots and onion.
Remove sausages and cut into three on an angle, then put back in pot with carrot, onion and paprika. Cook for another 15 minutes.
Add passata to pan then fill half way with water and swirl around then tip that in pan also. Drain and rinse cannellini beans and add to pan with salt and pepper. Cover and put in oven for 20 minutes.
Pick rosemary and toss in olive oil.
Remove lid from cassoulet, sprinkle rosemary over top and put back in oven for another 30 minutes.
Serve on hot ciabatta bread or over rice.
Now as I said, I double it - I had 8 sausages, but still used the same amount of passata. I also added leftover roast veges from the night before, which included a whole roast onion, so I omitted the red onion.
We are having this again tonight and I will put it in the slow cooker shortly to heat it up again, and will serve with cheese on top and some warm crusty bread.
Last but not least, biscuits. Now these were for the birthday lunch. I was sent this suggestion on FB and thought they looked fun. As some of you may remember, I attempted some biscuits that were meant to be swirled and then rolled in 100's and 1000's last year. These are similar only they were meant to look like butterflies.
Again, the recipe suggested is a shortbread recipe. Any of you who have ever made shortbread will know that it is a dry recipe. So again, I was unable to get this to work and instead ended up with striped "zebra" biscuits instead:
Here is the actual recipe:
powdered sugar, 1 cup;
• baking powder, 1 teaspoon;
• margarine, 3/4 of a cup;
• flour, 2 cups;
• corn starch, 1 cup;
• vanilla extract, 1 teaspoon;
• cocoa, 1 1/2 tablespoons;
• 1 egg;
As said before, the recipe is based on a traditional and simple cake but with a creative twist. First, stir in all, but the cocoa, in a bowl in order to prepare the dough, while the oven is preheated to 350 degrees Fahrenheit. When the ingredients are combined in a nice mixture separate into two balls of equal size. Take the cocoa and add it in one of the balls. Put the pair of dough wrapped in some plastic for about 30 minutes in the fridge.
Remove from cooling and spread the balls into rectangles, with the cocoa layer underneath the simple one. Slice in half with a knife and roll up each of them. Press them next to each other in order to look something like a fat or bloated butterfly. Take the knife again and cut into pieces. Take each slice and press a bit together with your fingers. It should look like a proper butterfly now. Place onto a tray and bake for some minutes. Yummy and creative!
I found the dough much too dry, and knew from past experience that chilling the dough first only makes it more brittle. I challenge you to make these and prove me wrong!
Anywho, that's me for the day! I hope you have enjoyed this one :) Oh and the cookbooks had a set back on formatting so fingers crossed we will have those this week!
Have a great week and Happy Cooking!
Don't forget to "like" my page so you don't miss out on any future posts :)