Wednesday, 26 June 2013

Drum roll please!

Alrighty, are you ready for this?  I have decided to share with you, my tan square recipe!  This is one that my Mum used to make, and I have yet to find a recipe better than this.  Not even the cafe's can compete with this one!  Ask anyone who has tried it, they will tell you the same thing :)

This is the same recipe that I have shared with a few friends - who attempted, and sadly failed to replicate.  I don't quite know how it works for me and not others, but it seems to be that way.  Don't let that put you off though!

One very important note for this recipe, is that the condensed milk MUST be Nestle Highlander condensed milk - no other one works the same.  It must also be the original NOT the lite one.  The caramel just doesn't thicken enough with anything else.

Tan Square

175g butter
1/2 C sugar
3 C flour

Melt butter, beat in sugar, add flour and mix together.  It will be very crumbly - basically like flour with a few lumps in it. 
Press majority of this into a lined (important to line this recipe) slice tin.  Using the back of a spoon, smooth it over, you don't want any dips.

In a saucepan:

100g butter
1tsp vanilla essence
2 Tbsp golden syrup (I just eyeball it)
1 tin condensed milk * see note above

Heat gently, stirring occasionally.  You want to keep an eye on it, so that it doesn't heat too fast and start to burn.  Once butter has melted then remove from heat.  It should be nice and thick.
Pour over the base.  Spread to cover all the base, and sprinkle the remaining flour mix over top - use as much as you like.  Put in oven and bake at 180 C for 15 - 20 mins or until sides just start to brown.

Let it cool before slicing.  It is best kept in the fridge.


Looks good doesn't it? :)
I have also been thinking about the Chocolate Lasagne from last week, and how I could make it even better.  I think I may have come up with an answer!  Don't get me wrong, it was great, but I feel that with a name like that, it needed to be a bit more chocolatey, and what I have in mind would make it more decadent.
Home made chocolate mousse!  This is a creamy, delicious addition instead of the chocolate pudding.  I think I might have to try it and then let everyone know how it goes.  If you're going to try it though, you have to make it properly, none of this store bought mousse.  I use cream, egg yolks, chocolate (either dark or white works well), and a little sugar.  It is the best!
I also like to make this when I am making a pavlova.  I split my pav mix into two discs, and then sandwich them together with the chocolate mousse, top with cream and berries (whole or pureed), and shaved chocolate.  It ... is ... DIVINE!!!!  Of course I will make one to show you one of these weeks too :)
Anyways, just a short one this week, as I'm away again this weekend :)  Happy experimenting!


Friday, 21 June 2013

Sugar and Spice and All Things Nice

I've been getting a bit of advice on how to take better pics for my blog :) In case you hadn't noticed, there are two types of pic on here - a bright, clear, looks like it came from a magazine type, and a dull, grainy, amateur type.  Guess which ones are mine??  :)
The really awesome pics you see are taken by my sister, who happens to be a photographer (you can check out more of her work here). 
So after listening to her tips, I've given it another go, and I think you'll find they are somewhat better!  Not quite to her standard, but I'm impressed with myself - someone's gotta be right??

Anywho, onto the topic of the blog - I know all you really wanna hear about are my fantabulous (and lack there of) kitchen creations!

Sweet treats!  That pretty much sums up what has been happening this week.  I made some cupcakes that are meant to taste like doughnuts, one of my favourite biscuit recipes, and ... CHOCOLATE LASAGNE!!!!!  I know right?  Drool ...

So first up, the doughnut cupcakes - simple recipe - again from Facebook.


1 3/4 c (all purpose) flour
1 1/2 tsp baking powder
1/2 tsp salt
1/2 tsp nutmeg
1/4 tsp cinnamon
1/3 c vegetable or canola oil
3/4 c white granulated sugar
1 egg
3/4 c milk

Combine dry ingred. Mix liquids in separate bowl. Add liquids to dry and combine together well, without over beating. Spoon mixture into prepared muffin tins. Bake at 350 for 20-25 min.

While muffins are baking prepare sugar topping.
1/4 c granulated sugar
1/4 tsp cinnamon

While muffins are hot, dip into (1/2 c) melted butter and roll into sugar & cinnamon mixture.
Now I followed this recipe except for the last part.  I sprinkled the sugar and cinnamon on top before baking.  I did this because I thought it seemed easier, and I was worried about the butter making the cupcakes soggy - or worse, have that horrible slimey butter feel on the roof of your mouth.  They still taste like doughnuts - only a bit stodgier than I was expecting.  Anywho, this is what mine look like:

Moving right along.  The biscuits I made were Raspberry Drops.  It's a recipe that my Mum used to make and she passed it on to me.  It's basically like a shortbread with jam dolloped in the centre ... yum!
(Look at that beautiful photo!)
These biscuits are good with any flavour jam too.  And oh so good when they are fresh from the oven!

Now for the moment I know you have all been waiting for ... CHOCOLATE LASAGNE!!!!
And yes it is just as good as it sounds :) 


1 package regular Oreo cookies (Not Double Stuff) – about 36 cookies
6 Tablespoon butter, melted
1- 8 ounce package cream cheese, softened
1/4 cup granulated sugar
2 Tablespoons cold milk
1- 12 ounce tub Cool Whip, divided
2 – 3.9 ounce packages Chocolate Instant Pudding.
3 1/4 cups cold milk
1 and 1/2 cups mini chocolate chips

DIRECTIONS

1. Begin by crushing 36 Oreo cookies. I used my food processor for this, but you could also place them in a large ziplock bag and crush them with a rolling pin. When the Oreos have turned into fine crumbs, you are done.
2. Transfer the Oreo crumbs to a large bowl. Stir in 6 tablespoons melted butter and use a fork to incorporate the butter into the cookie crumbs. When the butter is distributed, transfer the mixture to a 9 x 13 inch baking dish. Press the crumbs into the bottom of the pan. Place the pan in the refrigerator while you work on the additional layers.
3. Mix the cream cheese with a mixer until light and fluffy. Add in 2 Tablespoons of milk, and sugar, and mix well. Stir in 1 and 1/4 cups Cool Whip. Spread this mixture over the crust.
4. In a bowl, combine chocolate instant pudding with 3 and 1/4 cups cold milk. Whisk for several minutes until the pudding starts to thicken. Use a spatula to spread the mixture over the previous cream cheese layer. Allow the dessert to rest for about 5 minutes so that the pudding can firm up further.
5. Spread the remaining Cool Whip over the top. Sprinkle mini chocolate chips evenly over the top. Place in the freezer for 1 hour, or the refrigerator for 4 hours before serving.
Right so as you can see, I split this into two containers - mainly because in a moment of blondeness I had it in my head that 9 x 13 inch pan would be a slice tin - and when I put the oreo layer in, I could see it wouldn't all fit in there - but afterwards I realised that the measurements would be more likely to be that of a casserole dish!  I do quite like it in the loaf tins though, you get nice deep layers.
The recipe says one pack of oreo's (36 cookies) but one pack here only consists of about 14, so I used a double pack.  I also adjusted the chocolate pudding amount.  I had it worked out that it would be 4 packs of instant pudding mix, but I only used 3.  I also decided to use regular cream (whipped with a little icing sugar and vanilla) instead of canned stuff.
The kids were glad to have a treat after the cold wintery day we had today.  As you can see it went down really well :)
I don't anticipate much on the culinary genious this weekend.  I'm off to the "Mother of the Year" Awards tomorrow night - my sister has been nominated :)  Quite looking forward to a night off!  Happy weekend, and stay warm!!

Wednesday, 12 June 2013

Sugary sweetness

Wow!  I made some cupcakes today ... the title of this blog pretty much says it all.  My sister sent me a link on my Facebook page suggesting I make them, so I figured, Why not?  I mean with a name like "Cookie crazy cupcakes" how could I possibly resist??

This is what they are meant to look like (note I said "meant")
This is what mine looked like:
Reasonably close, though the cookie dough part doesn't really stand out.  It kinda just looks like I somehow put a clump of choc chips in the middle of the cupcake.  As the recipe didn't state the recipes of either part, I think I did pretty good.  I used my favourite choc chip recipe - though slight mishap, I used baking powder instead of baking soda - and still had plenty leftover to make some cookies as well :)  Pantry fully stocked - check!
Also because there were extra parts to this, it made 17 cupcakes instead of the usual 12.  With the flavour as sweet as it is, you could easily just eat half of one and save the rest for later, so all in all, you get a lot for little effort.

Anywho, here are the pics of baking progress:


If you look closely at the last pic, cupcake on the top right and one diagonally left of it, have funny looking icing.  Somehow I managed to get a crystallized bit of sugar stuck in the piping nozzle part way through and it just started shooting out all 'floofy' - yes I am aware that I seem to have a lot of icing mishaps, I don't know what it is about me and icing!

I should probably mention that I just used a vanilla cupcake and buttercream as I didn't want to overdo the chocolatey goodness.  I would also like to point out that this recipe was harder to judge when they were ready as the cookie dough part makes the centre take longer and it kinda bubbles a bit.  They definitely took longer than normal.

I know you're all dying to know my cookie recipe :) so here it is!

Choc chip cookies

75g butter
1/2 C each brown and white sugar
1 egg
1/2 C choc chips
1/2 tsp baking soda
1 1/4 C flour

Preheat oven to 180 C
Melt butter, add sugars and egg.  Beat with a fork.
Add choc chips and mix
Add baking soda and flour
Roll into walnut size balls, leaving room to spread and flatten slightly with a fork.
Bake for 10-12 minutes or until golden

The great thing about these cookies is that you can bring them out when just starting to colour and have them be chewy, or you can leave them a little longer until they start to just flatten a bit more and have them crunchy (just like a bought one!).  I recommend using dark choc drops.

Another recipe I wanted to share with you, is a family favourite.  Falafel. 
A few years ago, my sister and I went to a Mediteranean cooking class, which was so much fun, and it was here that I learned to make my own falafel.  And the great thing is, it's healthy and the whole family love it!  (Even my husband who loves his meat.) 
Now I have to warn that this is one of those recipes that others don't seem to be able to replicate - including my sister - so don't be disheartened if it doesn't work the first time.

Falafel

3/4 C chickpeas (the dry ones, not tinned) soaked overnight - or for a minimum of 8 hours
garlic clove crushed
good handful of parsley
salt and pepper
1 tsp cumin seeds
1 tsp coriander seeds
1/2 onion (optional)

Once chickpeas have soaked, drain them and put in food processor with other ingredients.  Process, pulsing until you get the desired consistency. (see pic)
Scrape into a container, cover and leave in fridge for minimum of half hour.
When ready to cook, scoop into balls - I use two forks and fill my palm with mix and then squeeze until ball is formed.  Now mix is easily broken up so you want to gently place it down and make a few more.
Heat oil in pan - you want the pan to be covered and there to be a layer - we're not deepfrying, but does need a bit of oil.
When hot, gently ease balls into pan.  Cook until browned on each side - cook first side for longer so it will hold together when you flip it.  I again use the forks for this part.
Once cooked, place on paper towel to drain a bit.

To serve - we make either burgers or wraps - you want to put a few falafels onto whichever one you are using, and flatten slightly with a fork.  Sprinkle grated cheese on top, swirl on some yoghurt garlic dressing and sauce of your choice (bbq or sweet chilli are best), grated carrot and tomato on top and then if using wraps you want to roll it up in tinfoil and place in sandwich press to seal and heat other ingredients.


So there you have it, one sweet and one savoury recipe for y'all this time :)  Happy cooking!

Saturday, 8 June 2013

Would you like nachos with that?

After the mad kitchen rush of the weekend, I have been a little slack in the 'new and exciting' food adventures this week.  I did, however, make some awesome Chocolate Oaty Biscuits.
They're the chewy kind, which I love!  And super easy to make.  I can't take the credit for this recipe though.  You can see the recipe here

I did try a variation on our usual nacho meal this week.  I was inspired after watching Rachael Ray.  They were showing all these different ideas and I adapted one.  Wasn't too bad, although there are a few things I would change.  What I did was, I browned some mince and onions and seasoned with salt and pepper, and smoked paprika.  At the same time I had some streaky bacon cooking in the oven ... mmmmm ... bacon ...
Anyway, I tried to do it the American way by heating the chips in the oven first and then topping after, but the cheese doesn't really melt this way, so that is one big thing I would change about this recipe.  So it went - nacho chips, mince, bacon, chopped tomato, grated cheese and served with a dollop of sour cream.  The idea is for it to taste like burgers, which it kinda did, but not quite.
Right then.  Here is how I would do it next time:
Brown mince and season with salt and pepper.
Add can of chilli beans and heat through.  Add a swirl of bbq sauce.
At the same time, cook bacon in oven until crispy.
Arrange nacho chips on plate, top with mince mix, crumble bacon on top, scatter chopped tomatoes over, sprinkle grated cheese and pop in oven to melt cheese.  Serve with sour cream.
My reasoning for adding the chilli beans, other than the fact that it's not really nachos without them, is that it would be easier to scoop mix on chips with the extra sauciness (yes that is a real word!)

The other meal I want to share with you, is the one I made tonight.  Again, inspired by Rachael Ray (same episode), she served this dish over nacho chips also, but I decided to just have it with bread.

Chicken and Chorizo Gumbo!  Never made one before, and to be honest, didn't really know what Gumbo was until now.  I did a bit of research and apparently a traditional Gumbo is made using Okra, but as I have no idea where you can get that here, I decided to just throw in a few different veges.  The result was rather tasty! Hubby even had second helpings :)  Anywhoodle, here is how I made it:

I used chicken thighs (boneless) but you could use breasts too or use a whole bird and make your own stock. 
Poach chicken in either water or chicken stock.  Pull apart and set aside.
Heat oil in casserole pot, add chorizo (skinned and in bits) and bacon if adding.  Brown this and then  set aside.
Add butter/oil to pan to make up to about 1/2C and add slightly less flour to make a roux.
Add chopped capsicum, onion, carrot and potato to pan and stir through.  Throw in a bundle of parsley and thyme.  Cover and let it sweat.
If needed, deglaze pan a little with some white wine vincon.
Add about 3C chicken stock to pan along with a sprinkle of smoked paprika, cumin and coriander (ground).  Stir through.  Depending on your stock, you want to reduce it til it has a gravy like consistency.
Add chicken and chorizo back to the pot.  Heat through.
Serve with bread/nachos/plain cooked rice


As you can see it's a really thick, hearty meal.  Great for a winter warm up.  And it makes plenty!  Stock up the freezer for an easy ready made meal, or make it when feeding a tribe of people :)  I seasoned mine, but don't really think it needs much with the bacon and chorizo in it.  It does have a bit of a kick to it - if your chorizo is a spicy one - so if you're not into that, you could substitute it with another full flavour sausage.

So there you have it. My less exciting adventures in food for the week! A few new meal ideas and of course a chocolatey treat :) Enjoy!

Monday, 3 June 2013

Cheese glorious cheese

Bare with me, this could take a while! 
As you know, my daughter turned one last week :) big milestone, calls for big celebrations!  Her actual birthday was spent at home with the family - and a little trip to the playground.  For her cake I made a bear (she has a favourite teddy bear who has to go everywhere with her).  I used my favourite chocolate cake recipe - favourite because it always has a fudgy taste - although I didn't have any white wine vinegar (should always make sure you have correct ingredients before beginning, not part way through!), so I ended up adding a bit of white wine vincon.  The icing took a bit of practice but I think I got it in the end.  The girls were quite impressed with it, though the icing was their favourite part!


Ok so I know there could have been some more definition on the bear, but I was having enormous troubles getting the writing fudge to stick!

Moving on to Saturday.  I spent the majority of the day in the kitchen preparing for the festivities the next day.  My first thing to make was cupcakes.  I used my hokey pokey cake recipe, but split it into cupcakes instead.  Batter was much thicker than my usual cake mix, but it still seemed to work ok, just a bit more of a 'crust' on top.  I also made the mistake of under-estimating the gap between oven racks!  Yes.  I put them too close together and the second lot ended up with a scrape mark across the top of them - nothing a bit of buttercream can't fix!.  I still had some leftover icing from the cake so I brought it back up to room temperature and gave it a mix with a fork - probably should have beaten it though.  It wasn't quite the right consistency so ended up breaking a bit when I was piping it - but by the time I was up to that part, I was about ready to give up, so just pushed on through with it anyways - I mean, that's what fondant decorations are for right?? 
And this time, I have to say, the fondant behaved much more to my satisfaction :)

How cute are they???  Kaylee has just starting saying "duck" so I figured I may as well use that to my advantage and make something she will recognise.  Clever huh?  I know :)
So this time I used the gum powder with the fondant and it did seem to make them easier to model, so will continue to do so in the future.

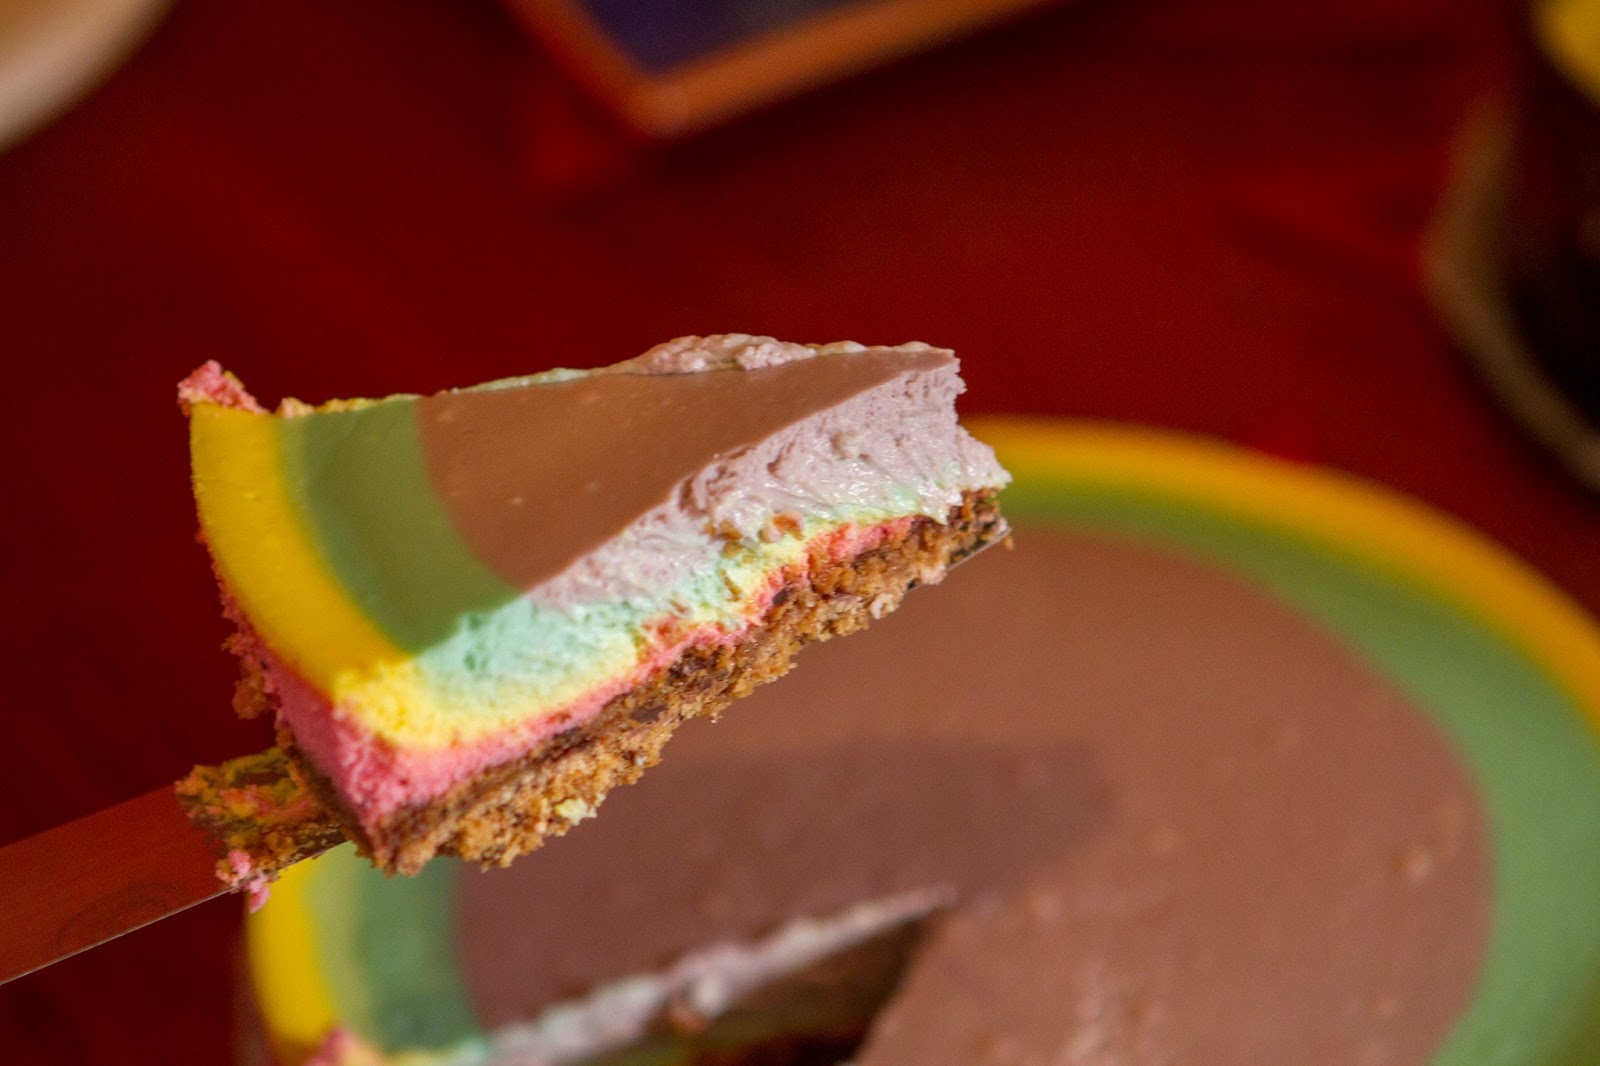
Now the part I am most proud of ... CHEESECAKE!!!!!  Is your mouth watering yet?  If you're anything like me, you will love a good cheesecake, and this is certainly a good one!
http://www.tablespoon.com/recipes/rainbow-cheesecake-recipe/1/      <this is the link to recipe I used

Ok, so in the recipe, it says graham crackers - which here in NZ we don't have - but I used digestives/choc wheatens.  I used two packs, which is probably more than needed, but I decided to split it between two pans (for two reasons - lots of people will be coming to eat this, and I really didn't see how that amount could possibly fit into just one tin). 

So the other thing I did differently from the recipe, is that instead of a waterbath, I placed a baking dish of water on the shelf below the cheesecakes and this worked just fine - and then you have no worry of water seeping into the tin.
Now I know when you look at the recipe, you will be thinking "Wow!  That's a lot of cream cheese!" not to mention all the other goodies in there, but trust me - it is sooo worth it!  This is one of the creamiest cheesecake recipes I've ever tasted!  And, the recipe is correct, it would all fit into the one pan - and the colours would work slightly better then - but you really don't need it to be that thick.

See how creamy and awesome it is??!!  The top pic is just the cream cheese, and the bottom pic is with the sour cream, cream and eggs added.
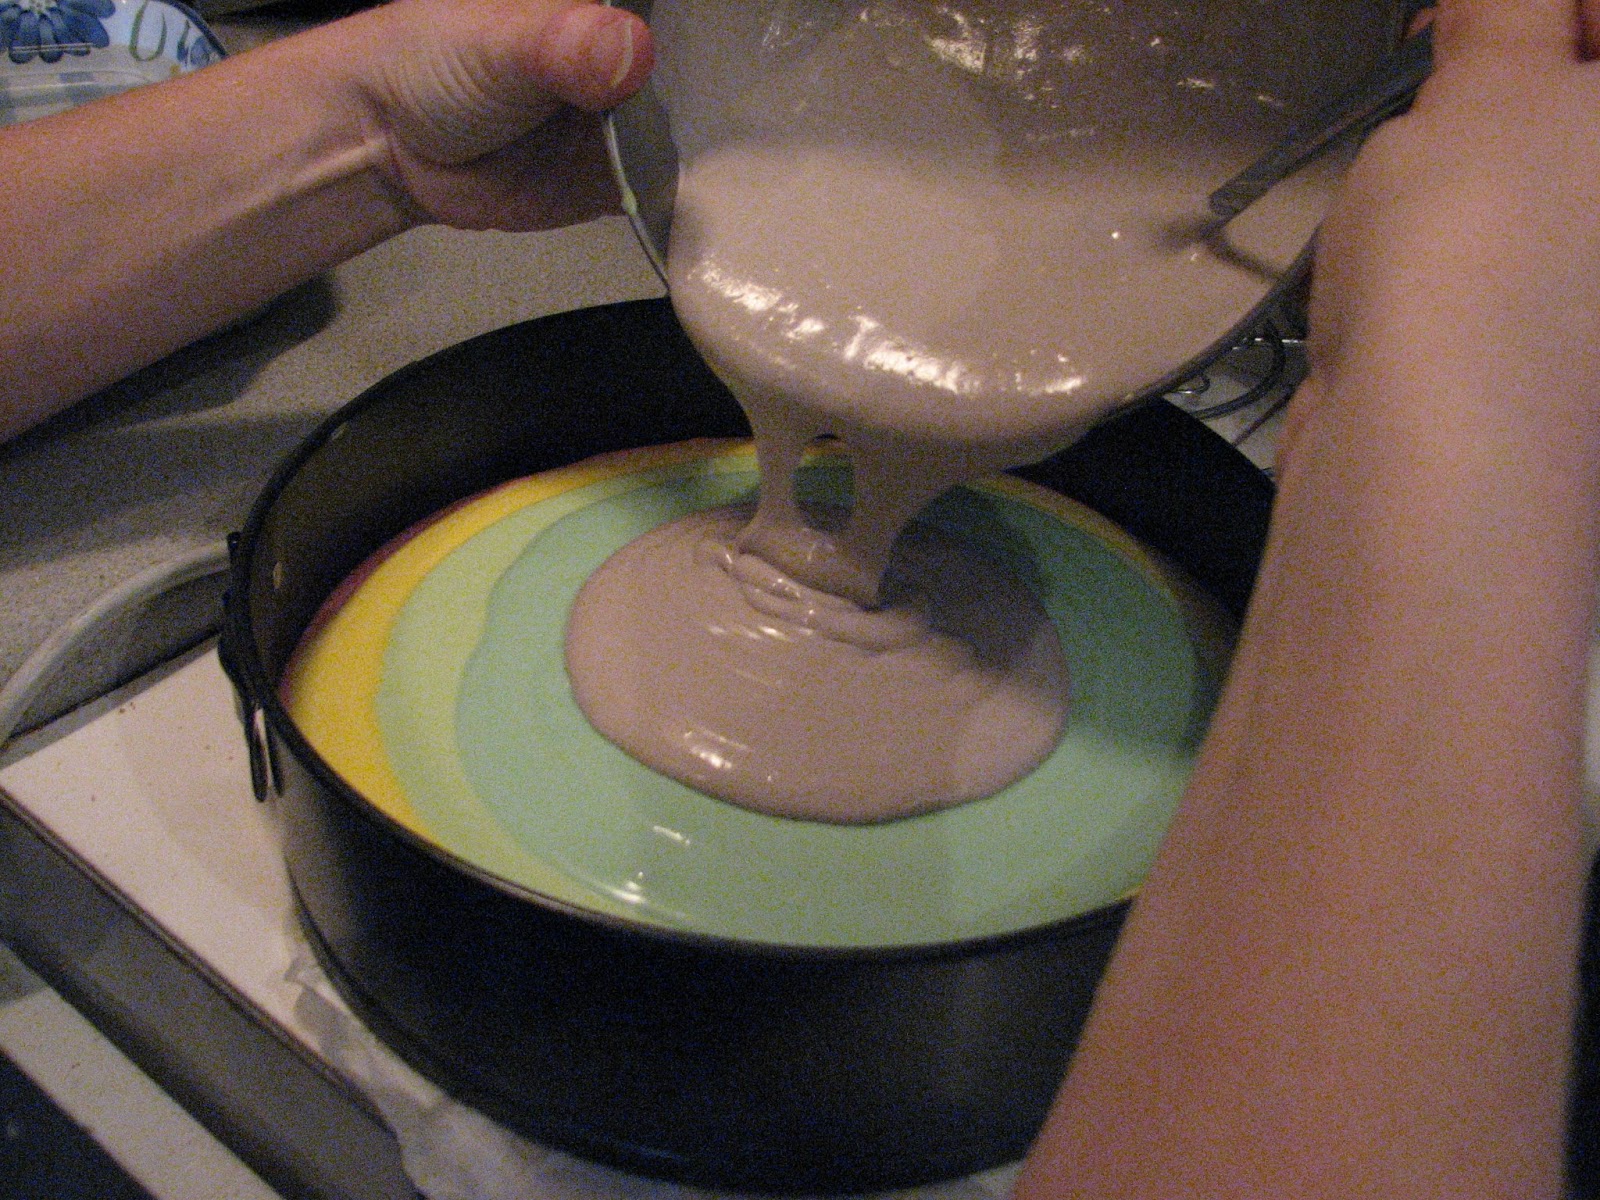
This is what my bowls looked like once I had divided the mix up - It said 6 bowls but I thought 5 was enough.  I also flavoured my colours: Blue - Blueberry, Pink -  Cotton Candy, Purple - Tutti Frutti, Yellow - Lemon, Green - plain

Now the fun part - Pouring!

So obviously you have to keep pouring in the centre to get the effect.  You also need to pour quite slowly so that the colour doesn't take over the previous one.  I found that I needed to move the pan rotationally to even it out a bit.  I think if you were using the entire mix in one pan instead of dividing it, that the colour effect would possibly stick out more and be thicker chunks of colour too, but I'm still happy with how it turned out.


I baked mine at 150 C (fanbake) and it was in for about an hour.  You just need to keep an eye on it and turn oven off when the centre is set.  I used the lower temp so it wouldn't brown on top.  I left it in the oven for around 45mins, before removing and leaving on bench to cool before covering and putting in fridge.

And so ended my Saturday of baking.  Onwards Sunday!  More kitchen time for me!  Damn I'm a good mum :)
Sandwiches - check, cocktail sausages - check, punch - check ... come on!  I was a cooking machine, I had to have something to reward myself!  Yeah yeah, I know, the joy of seeing people enjoy my food, blah blah blah - that too :)
Vege rolls - like sausage ones, only meat free.   So simple to make!  Choose your veges - carrot, potato, pumpkin, brocolli, courgette etc and cut/grate into little cubes.  Put in pan and just cover with water.  Boil for 3-4 minutes then drain and put in a bowl with about 2C cheese and mix, then cool.  Once cooled, place along edge of puff pastry sheets and roll up, sealing with water/milk, cut into pieces and bake!  Great with sweet chilli sauce.


And of course, it wouldn't be a party without Hot Cheesy Bread Dip!  I was given this recipe a few years ago by one of my Dads friends.  It is ... I'm gonna say it ... Amazeballs!  I always have people asking for the recipe.  So here goes ...

1 Vienna Loaf
Capsicum 1 green and 1 red - I normally use half of each
2 ham steaks (or diced bacon, ham)
3Tbsp Mayo
1 1/2 Tbsp Lemon Juice
pinch of garlic salt
2 tubs cream cheese (or you can use 1 tub and then mix in some grated cheese - about 1C)

Cut top of loaf and hollow out.
Mix all other ingredients together and spoon into loaf
Put lid back on and wrap in tinfoil
Bake in oven at 150 C for 2 hours
Serve with crackers or carrot sticks etc


And there you have it ... long winded I know, but well worth it!  I love a good chance to entertain people and show off my mad kitchen skills!